
MANKATO KASOTA STONE, INC.
818 North Willow Street
Mankato, Minnesota 56001
United States of America
Tel: (507) 625-2746
Fax: (507) 625-2748
E-mail: sales@mankatokasotastone.com
Web site: http://www.mankatokasotastone.com

Pre-fabricated Minnesota Limestone thin stone veneer is stocked and readily
available in a predetermined variety of colors, finishes, sizes and architectural
shapes from Mankato Kasota Stone, Inc. Installation methods are outlined below.

Framed Exterior Wall
- Cover exterior sheathing (1) with a weather resistant vapor barrier (2),
overlapping a minimum of 4 inches at joints.
- Install expanded metal lath (3), again, overlapping a minimum of 4 inches
and fasten with galvanized nails or screws at 6” O.C. vertical and 16”
O.C. horizontal.
- Apply a 1/2”-3/4” thick scratch coat (4) completely covering
the metal lath, then using a metal scraper or small scrap of lath, lightly
rake horizontal grooves into the scratch coat.
- Let scratch coat cure completely.
- MKS Thin Veneer (5) may now be applied using the following steps:
- Cover the back of each stone with at least 1/2” of mortar.
- Press stone firmly into place, making extra mortar to ooze out*.
*This extra mortar may be used to create your grout joints, if extra is not
used for joints, the joints can be filled with grout after the stone is installed,
using a grout bag and/or a tuck pointing tool.
- Let stone set for at least 48 hours, then clean in its entirety with a
mild detergent and a soft bristled brush.
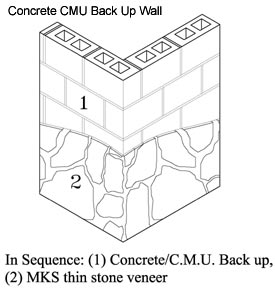
Concrete/C.M.U. Backup Wall
If the back up is newly poured or set, no special preparation is required
before MKS Thin Stone Veneer is applied.
- MKS Thin Veneer may now be applied using the following steps:
- Cover the back of each stone with at least 1/2” of mortar.
- Press stone firmly into place, making extra mortar to ooze out*.
*This extra mortar may be used to create your grout joints, if extra is
not used for joints, the joints can be filled with grout after the stone
is installed, using a grout bag and/or a tuck pointing tool.
- Let stone set for at least 48 hours, then clean in its entirety with a
mild detergent and a soft bristled brush.
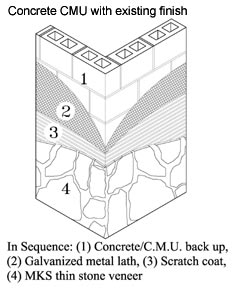
Concrete/C.M.U. Backup Wall with Existing Finish
If the back up is painted, sealed, or noticeably rigid, a galvanized metal
lath and a scratch coat of mortar should be applied prior to installation of
MKS Thin Stone
Veneer.
- Install expanded metal lath, overlapping a minimum of 4 inches and fasten
with galvanized concrete screws or nails at 6” O.C. vertical and 16”
O.C. horizontal.
- Apply a 1/2”-3/4” thick scratch coat completely covering the
metal lath, then using a metal scraper or small scrap of lath, lightly rake
horizontal grooves into the scratch coat.
- Let scratch coat cure completely.
- MKS Thin Veneer may now be applied using the following steps:
- Cover the back of each stone with at least 1/2” of mortar.
- Press stone firmly into place, making extra mortar to ooze out*.
*This extra mortar may be used to create your grout joints, if extra is not
used for joints, the joints can be filled with grout after the stone is installed,
using a grout bag and/or a tuck pointing tool.
- Let stone set for at least 48 hours, then clean with a mild detergent and
a soft bristled brush.
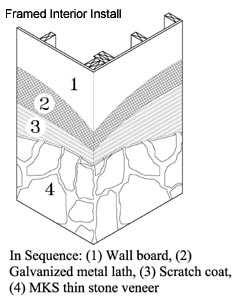
Framed Interior Wall
- A wall board is needed for the base of the application surface. (i.e. gypsum
board, concrete board or plywood).
- Install expanded metal lath over wall board, overlapping a minimum of 4
inches and fasten with galvanized concrete screws or nails at 6” O.C.
vertical and 16” O.C. horizontal.
- If using a concrete board, most building codes do not require that metal
lath or a scratch coat be used, if this is the case, skip the next two
steps.
- Apply a 1/2”-3/4” thick scratch coat completely covering the
metal lath, then using a metal scraper or small scrap of lath, lightly rake
horizontal grooves into the scratch coat.
- Let scratch coat cure completely.
- MKS Thin Veneer may now be applied using the following steps:
- Cover the back of each stone with at least 1/2” of mortar.
- Press stone firmly into place, making extra mortar to ooze out*.
*This extra mortar may be used to create your grout joints, if extra is not
used for joints, the joints can be filled with grout after the stone is installed,
using a grout bag and/or a tuckpointing tool.
Let stone set for at least 48 hours, then clean with a mild detergent and a
soft bristled brush.
Care During Installation
During installation care must be given to mask and protect the stone already
set All mortar droppings adhering to the stone should be removed immediately.
All tape should be removed as soon as work is completed in the area to prevent
any
marking from tape adhesive.
Sponge the stone free of mortar along the joints as work progresses. After
completing the mortar and tuck-pointing process, stone should be cleaned of
all
stains and foreign matter by using a stiff fiber brush, water, mild soap, and
final flushing with clear water.
Note: the brush can dull the surface of honed or polished stone depending upon
the pressure applied.
General Cleaning Methods
- Thoroughly wet area with clean potable water, then sponge clean.
- Wet the area with clear water. Using a mild detergent, potable water, and
a sponge, gently clean the stone. Thoroughly rinse with clean water before
the detergent dries.
- Using a standard garden hose with a typical nozzle and normal tap pressure,
wash the area.
Never use cleaners that contain acids on limestone, it can dull, discolor,
etch and leave streaks on the finish of the stone. Be cautious of common household
cleaners, common foods and drinks (such as alcohol or citrus juices) which can
contain acids.
For more information on care and maintenance of Mankato Kasota stone, please
contact your local dealer.
Check your local and state building codes.
Mankato Kasota Stone, Inc.
Please let us know how we can assist you in your next project by contacting
us at our Central Office: 507-625-2746
|