
 GBP Silvercote
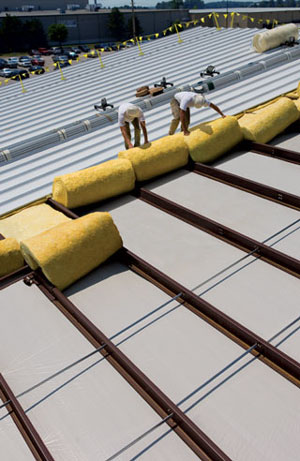
 29200 Fountain Parkway Solon, Ohio 44139 Toll-Free: (800) 231-6200 WHY CHOOSE ENERGY SAVER FP™ ? Energy Saver FP™ is a high R-value metal building insulation system that provides excellent thermal performance and an aesthetically pleasing interior finish. Energy Saver FP™ is designed to work in most all metal building types utilizing screw-down or standing seam roofs and fits most any purlin style. FALL PROTECTIONProtects the installation crew while the building is insulated and roofed by providing OSHA-compliant leading edge fall protection. EXCELLENT INSTALLED THERMAL PERFORMANCEThe system allows for maximum fiberglass insulation recovery. EXCEPTIONAL FIRE PERFORMANCEBoth the fiberglass insulation and Energy Saver FP™ fabric feature a FHC 25/50 flame spread and smoke development rating per ASTM E-84. CLEAN, BRIGHT AND DURABLE INTERIORThe Energy Saver FP™ fabric resists tears and conceals secondary structural supports, providing a smooth, bright and durable finished surface. SUPERIOR CONDENSATION CONTROLFeaturing a .02 perm rating, seamless installation, and minimal penetrations, the Energy Saver FP™ system offers excellent isolation from secondary structural steel to help prevent condensation. ROOF AND WALL INSULATION SYSTEMSROOF SYSTEM - The Energy Saver FP™ system consists of a network of straps (white painted galvanized banding), a bright white support fabric and fiberglass blanket insulation. Each piece of the support fabric is custom made to fit a specific location within the building. High R-values are achieved by filling the purlin depth with uncompressed blanket insulation. The insulation is positioned on exterior side of the fabric in various R-values depending on the project requirements and available space. Our popular double layer system consists of two layers of fiberglass; one installed directly on top of the fabric (parallel with the purlins), while the second layer is positioned above and perpendicular to the purlins (minimizing conductive heat transfer from the purlins to the roof panels). In our single layer system, the fiberglass is installed directly on the fabric and thermal spacer blocks* are positioned on the purlins. The Energy Saver FP™ system provides excellent condensation control, is bright, durable, and requires little maintenance. Energy Saver FP™ is not recommended for high humidity applications and should never be used in buildings housing pools or open sources of water. WALL SYSTEM - The Energy Saver FP™ system may also be installed in wall structures. Popular installations include both single and double layer systems. As with the roof, it is important to limit conductance through the steel members by installing a "thermal break" between the girts and wall panels. In a double layer system, the second layer of fiberglass accomplishes this task. *Thermal spacer blocks are not included in base system price. If desired specify with the order.INSTALLATION Roof System Step 1: Install a series of longitudinal (parallel) bands within each purlin space. It is required that two longitudinal bands be installed in the eave purlin spaces. For the remaining purlin spaces greater than 48", install two bands per space; for purlin spaces 47" or less, install one band per space. Step 2: Pull this banding hand tight and fasten it to the tops of the endwall rafters with a banding clip and a single* high strength 12-24 TY5 11/4" self-drilling fastener with 3/4"OD washer that is supplied with the Energy Saver FP™ system. Step 3: Install a series of cross bands 60" on center threaded above every fifth or sixth longitudinal band by first attaching the end of one piece to the eave strut using a single* 12-14 TY3 3/4" self-drilling fastener with 3/4"OD washer. It is required that you position one run of banding within 6" of the frames. Pull hand tight and screw to the eave strut with a banding clip and a single fastener. When you reach the ridge space, thread the cross bands above the longitudinal bands. This positioning will allow you to deploy the Energy Saver FP™ fabric from one side of the building to the other, without interruption. Continue to thread the bands to the opposite eave strut. Pull hand tight and screw to the eave strut with a single* fastener. Be sure to remove all twists during this procedure. Repeat until all the banding within each bay space is installed. IMPORTANT – Refer to step 6 of the wall instructions if you are using the Energy Saver FP™ in both the roof and walls. Step 4: Unwrap and position the support Energy Saver FP™ fabric between the two ridge purlins in double slope building applications. Pull one edge of the fabric beneath the purlins toward the eave strut and temporarily connect the fabric to the eave strut with a vise grip C-clamp. Momentarily clamping the fabric allows you a last opportunity to square and smooth the fabric before the final attachment. If you intend to sheet both slopes at once, pull the other end of the fabric beneath the purlins toward the opposite eave. If sheeting only one slope, leave the remaining fabric gathered in the ridge purlin. Step 5: Once the fabric is smooth, install a single* fastener through each support band and the fabric into the bottom of the eave strut. Proceed from the eave strut towards the ridge, screwing the cross bands into the bottom of each intersected purlin. Continue to smooth the fabric throughout this process. If sheeting only one slope the last fastener is installed into the near ridge purlin. If both slopes will be sheeted simultaneously, continue from the ridge down the opposing slope terminating at the far eave strut. Step 6: Carefully notch the fabric around the purlins. Step 7: The edge of the fabric can now be sealed to the top of the rafter with brush adhesive (included) or two-sided tape (optional). This will be the final opportunity to tighten and smooth fabric. When installed by an Energy Saver FP™ certified contractor, the system provides OSHA-compliant, leading edge fall protection. Perimeter fall protection is still required. Step 8: Fiberglass insulation can now be installed on the support fabric. Most customers choose a double layer system in which one layer is installed parallel with the purlins and the second layer is installed above the first layer and perpendicular to the purlins. It is a generally accepted design principle that air cavities above a vapor retarder should be avoided for optimum condensation control. For this reason, you should make every effort to fill the purlin cavity with insulation. The Energy Saver FP™ system is not recommended for high humidity applications and should never be used in buildings housing pools or open sources of water. Purlin height and spacer block thickness (screw down roof), or roof clip height (standing seam roof) should be carefully considered when selecting the total system R-value and corresponding overall insulation thickness. NOTE: The Energy Saver FP™ system is designed for only single use leading edge fall protection. It is not intended to be stepped into or walked upon. In the event of a fall, Energy Saver FP™ cannot be relied upon to provide leading edge fall protection until the fabric and banding are replaced with new components. * Do not place more than one (1) fastener through the banding.Wall System Step 1: Most Energy Saver FP™ wall systems are single layer applications of R=19, R=25 or R=30, depending on available girt depth. In this case, you should apply 1/8" x 3" foam tape (a standard system component) to the exterior side of the girts (this is done during the sheeting process). Step 2: Cut 24" pieces of Insul-Hold strap and crimp to the outer flange of the wall girts, approximately 36" to 48" on center, with the arrows pointing up. Bend the arrows inward at a 45-degree angle. Step 3: Unfaced insulation is provided in roll widths of 36", 48", 60", or 72", depending on erector preference. Cut pieces of insulation to the girt space plus 1" for a tight fit. Place the insulation within the girt space and impale it onto the Insul-Hold arrows for support. Step 4: Unwrap and position the Energy Saver FP™ fabric (which is custom made to fit each bay space) at floor level - taking special care to keep it clean. Deploy the fabric upward toward the eave and temporarily clamp it to the "on plane" strap described in steps 5 & 6, below. Spread the fabric out over the entire bay and clamp where necessary to hold it in position. Step 5: Install a series of vertical bands (an included system component) 60" on center from the eave strut to the base angle using the self-drilling fasteners included with the system. If the Energy Saver FP™ system was previously installed in the roof, it is recommended the bands be positioned in line with the cross bands from the roof system (for a detailed drawing of this visit www.silvercote.com). Smooth out the fabric and install 12-14 TY3 3/4" self-drilling fasteners with 3/4"OD washers through the banding and fabric, into girts. Use the 3/4" x 98' Blue Transfer tape (included component) to adhere the fabric to the columns and base angles, making sure that the fabric is tight and smooth. Step 6: Connection of the wall system to the roof system can be accomplished very easily, providing that care is taken when installing the roof strapping. Within the first purlin spaces (i.e., the eave spaces), one of the roof straps needs to be positioned "on plane" or directly above the inside flange of the girts. That band should be positioned underneath the roof cross bands. With the band in position, the wall fabric can be brought upward, wrapped around the band, and glued to the roof fabric. The last step is to screw the vertical wall strapping through the fabric, through the previously described roof strap, and through the roof cross band. You will need to bend the very end of the banding 90 degrees for it to meet the roof strapping at the proper angle. WARRANTYWhat is Warranted and for How Long Guardian Building Products Distribution, Inc. d/b/a GBP Silvercote ("Guardian"), subject to the terms and conditions below, warrants:
Labor charges or other costs incurred with removal or installation of either the original or replacement Product are not covered by this warranty. In the event of replacement under the terms of this warranty, the original warranty shall apply to the replacement Product and will extend for the balance of the warranty period remaining at the time of replacement. Any Product considered to be defective should not be installed. Who is Covered This warranty is granted solely to the original purchaser. It may not be transferred; provided that if you purchase a new commercial building and are the first person to occupy the building, Guardian will consider you to be the original purchaser if the Products were installed as part of the construction of that commercial building. How to make a claimIn the event you believe that Product fails to conform to this warranty, you must notify Guardian at 1-800-231-6200, promptly followed in writing at GBP Silvercote, 29200 Fountain Parkway, Solon, OH 44139, Attention: GBP Silvercote Claims Department. Such notice must be made within sixty (60) days of the date the claimed defect was first discovered or reasonably could have been discovered. Written notice must include description of the alleged defect, a picture of the defective Product if possible, as well as proof of the date of purchase. Guardian may then promptly inspect the Product. If such examination does disclose a defect covered by this warranty, Guardian will perform its obligations under this warranty to the extent of the Product that actually manifests defects. Guardian reserves the right to inspect any Product that is alleged to be defective prior to its removal from the installation location. Guardian will not be liable for any actions or expenditures incurred prior to written acknowledgement of Guardian responsibility under this warranty. LimitationsThe Energy Saver FP support fabric contains UV stabilizers to improve its performance when exposed to UV light. Guardian does not warrant the Energy Saver FP support fabric for failure due to deterioration from exposure of the fabric to excessive amounts of UV light (including the use of indirect lighting), heat or exposure to chemicals which can cause rapid deterioration of the fabric resulting in flaking, brittleness and loss of strength. This warranty is void under any of the following conditions:
Purchasers of the Products are solely responsible for determining the effectiveness, suitability and safety of any particular use or application of the Product. Building code regulations vary from area to area. Purchasers should consult local building and safety codes for specific requirements. Guardian reserves the right to discontinue or modify any of its Products without notice to the purchaser. If Guardian replaces any Product under this warranty, it may substitute Product designated by Guardian to be of comparable quality in the event the Product initially installed has been discontinued or modified. GUARDIAN'S LIABILITY SHALL BE LIMITED SOLELY TO ITS RESPONSIBILITIES UNDER THIS WARRANTY. EXCEPT FOR THE EXPRESS WARRANTY DESCRIBED ABOVE, THERE ARE NO EXPRESS OR IMPLIED WARRANTIES OF ANY KIND AND THERE ARE NO WARRANTIES OF MERCHANTABILITY OR FITNESS FOR A PARTICULAR PURPOSE WITH RESPECT TO THE PRODUCT AND NO WARRANTY SHALL BE IMPLIED BY OPERATION OF LAW OR OTHERWISE. IN NO EVENT SHALL GUARDIAN BE LIABLE FOR INDIRECT, SPECIAL, CONSEQUENTIAL OR INCIDENTAL DAMAGES OF ANY KIND, INCLUDING ANY DAMAGE TO THE BUILDING, ITS CONTENTS OR ANY PERSON. SOME STATES DO NOT ALLOW THE EXCLUSION OR LIMITATION OF INCIDENTAL OR CONSEQUENTIAL DAMAGES, SO THE ABOVE LIMITATION OR EXCLUSION MAY NOT APPLY TO YOU. No variation or change in this warranty will be binding upon Guardian unless made in writing and signed by an officer of Guardian. This warranty gives you specific legal rights and remedies, and you may also have other rights which vary from state to state. This warranty shall only be applicable and enforceable in the United States of America and Canada. |