

The BlockNet™ system by Mortar Net USA, Ltd. is the first and only product that reliably protects
single wythe concrete block walls from the damage caused by water infiltration. By providing an open
path by which water can migrate to the exterior of the building while simultaneously preventing mortar
droppings from blocking that path, the BlockNet™ system allows the free migration of moisture
from the interior of the block cells to the building exterior.
BlockNet's unique design helps keep the wall interior dry, reducing or eliminating the moisture buildup
that can promote mold and create structural damage due to freeze/thaw cycles. In addition, it helps
preserve a building’s exterior and interior appearance by preventing efflorescence and staining.
The BlockNet™ system is composed of specially shaped 3 3/8" deep stainless steel drainage
strips with integrated drip edge, horizontal mesh element and rear water dam, plus a separate vertical
mesh element.
The horizontal mesh element of the BlockNet™ system is 1/4-inch thick, 90% open weave plastic
bonded to the drainage strip's upper surface.
The mesh will not oxidize, rot, promote mold or fungus growth, or react with other common building
materials. It suspends mortar droppings above the stainless steel drainage strip so water flow is unobstructed,
plus its unique, integrated weep tabs extend to the outside of the building, eliminating the need for
separate weep vents.
The vertical element is composed of 7" x 7" squares of the same mesh, and wicks moisture
past mortar droppings and onto the drainage strip. Prickly adhesion between the mesh and the block
holds the mesh in place, eliminating the need for adhesives or fasteners and preventing the mesh from
collapsing under the weight of mortar droppings. Because the drainage strip extends only 3" into
the wall, it will not interfere with properly installed vertical rebar.
BlockNet™ is shipped in boxes of 20, 6' long stainless steel drainage strips, plus 150 vertical
elements. Each box contains enough material for approximately 110 lineal feet of wall. BlockNet™ has
been researched, engineered and tested for flashing single wythe walls.
The BlockNet™ system should be installed directly upon the foundation or first course of block
above the foundation. Weep tabs must be above grade.
Note: All instructions for installation remain the same in foundation installation or first course
of block installation since architects may use either detail.
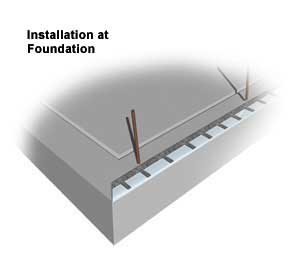
Place a starter strip with the mesh side up on the foundation at the left hand corner of the wall or
first course of block. The starter strip may simply sit on the foundation or the first course of
block or be stabilized by using any compatible sealant or adhesive. Align the underside of the drip
edge break with the front edge of the masonry.
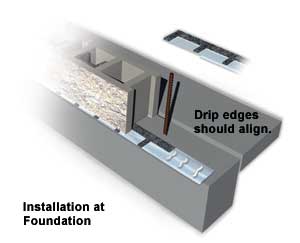
To install each connecting strip, run 3 evenly spaced silicone sealant beads from front to back on the
top of the existing strip on the 6'' wide unmeshed section at the right hand side of the strip. Position
the next connecting strip in place so that the drip edges meet and align. This will ensure the proper
6'' overlap of the strips. The strip should be firmly pressed into the sealant. Continue installing the
connecting strips in this manner.
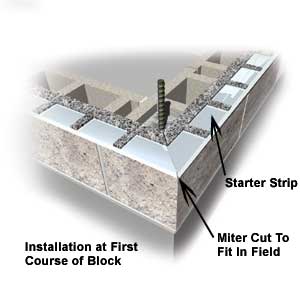
All corners will require a 45 degree miter cut as shown in figure 3.
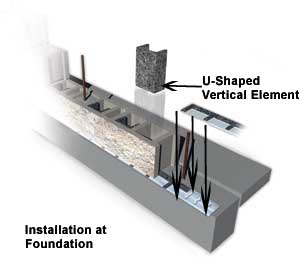
After the course of block directly on top of the drainage strips is set, install one 7''x7'' vertical
mesh element in each individual block core against the face of the core. Because each element is
slightly wider than a typical block core, they should form a “U” shape when viewed from
above. Each vertical mesh element must come in contact with the horizontal mesh on the drainage strip
below in order to wick water through to the weep tabs. Remove any excess mortar that is blocking
the contact between the vertical mesh and horizontal mesh prior to vertical mesh installation.
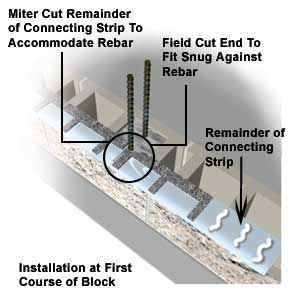
If a rebar is positioned so close to the front of the wall that it interferes with the installation
of the connecting strip, the mason must make field cuts. Simply cut the next connecting strip to
a length that abuts the rebar and set it in place. Take the remainder of the strip and clip off a
portion of the left end at a 45-degree angle to accommodate the rebar. Place this strip so that it
abuts the previously installed strip, and avoids the rebar. Seal any gaps with a thin bead of sealant.
Continue installing the strips in the usual manner.
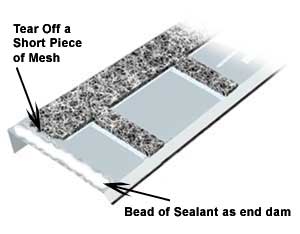
BlockNet™ can be used over wall openings, bond beams and structured steel members if the ends
are properly dammed. Tear off a short piece of mesh from each end of the lintel. At the very end of
the lintel, place a thick and high bead of sealant running continuously from the back of the strip
to the break of the drip edge.
Mortar Net® USA, Ltd.
326 Melton Road
Burns Harbor, IN 46304
Tel: 800-664-6638
Fax: 219-787-5088
Contact: info@mortarnet.com
|